Tammy and I
Sincerely Appreciate Your Patronage


TriggerShims
Links Page
TriggerShims
10/22 Trigger Shim Kit Installation Instructions
Rebellion Against Tyrants is Obedience to God
Whoever Would Overthrow the Liberty of a Nation
Must Begin by Subduing the Freeness of Speech
~ Benjamin Franklin ~
Manufacturer of
Trigger Shims Brand
American Made Gun Shims
- Home of -
TriggerShims.com
GunShims.com
ShivelySales.com
MichiganCenterOutdoors
SmallShims.com
Gun ShimsGun Smith Supplies
Since 2008
WWG1WGA
"America is the Greatest and Most Exceptional Nation in the History of the World..." D.J. Trump 45th POTUS
100% American Family Owned
Shively Sales - Manufacturer of
TriggerShims Brand
Gun Shims
in
Michigan Center, Michigan
"Better to be poor and honest than to be dishonest and rich." Proverbs 28:6

God Bless the U.S.A.
10/22 Trigger Shim Kit
Installation Instructions
Video and Written Instructions
for installing our
TriggerShims 10/22 Shim Kit.
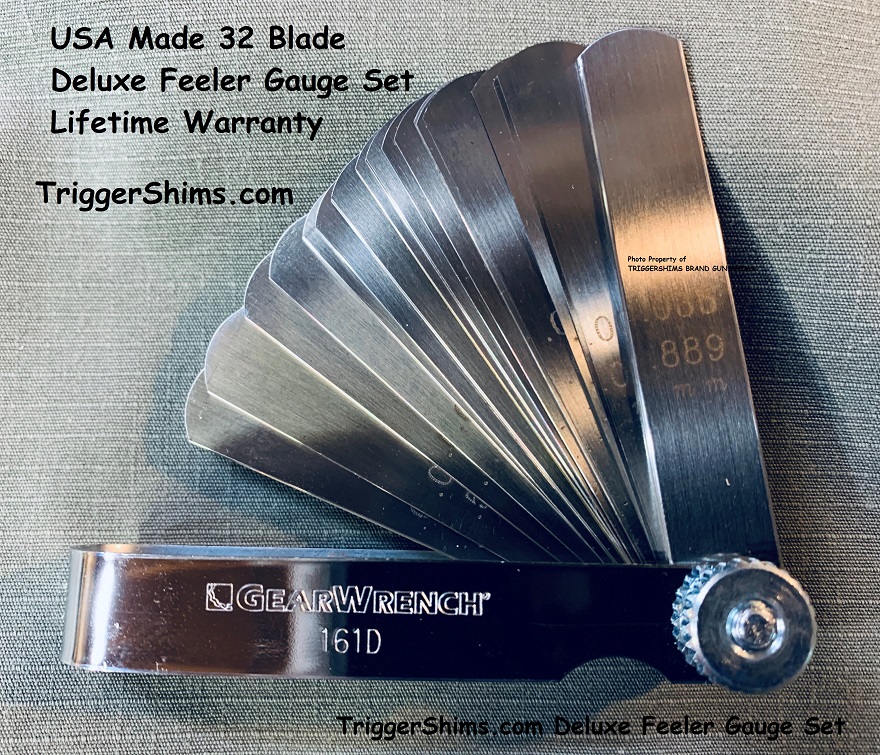
The easiest way to Measure your Trigger or Hammer assembly is with a simple blade type feeler gauge.
I sell a Nice U.S.A. Made set you can include in your orders.
It comes with a Manufacturers Lifetime Warranty
This 32 Blade Gauge will measure from .0015" up and is perfect for general use.
The price is $16.95 and includes Free Shipping
How to Install the 10/22 Trigger Shim Kit
Easy to Follow Written Instructions
- Trigger Shim Instructions - Shim Kit Instructions
- Volquartsen Automatic Bolt Release How To Instructions
- Volquartsen Extended Magazine Release How To Instructions
This Page shows how to install a TriggerShims Custom Trigger Shim Kit
Also check our Frequently Asked Questions page for additional tips
Ruger 10/22 Parts Diagram
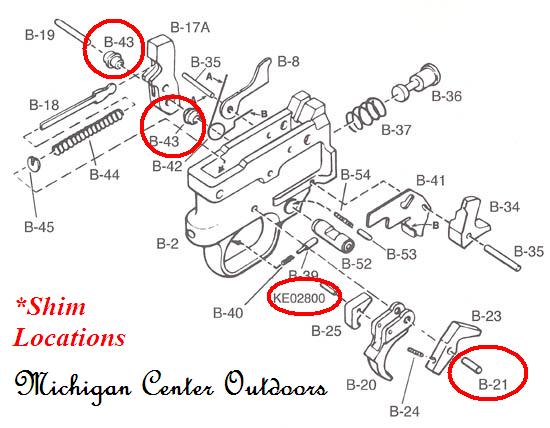
CLICK TO ENLARGE
~ How to Install a Trigger Shim Kit ~
Safety First! - Make Sure Gun is Unloaded!
Remove magazine, open bolt and make certain there is not a cartridge in the chamber.
Allow the bolt to close. Familiarize yourself with the disassembly instructions and parts list in your Ruger Owner Manual. Click on thumbnail above for a full size schematic.
Loosen the Barrel Band Screw (B-69) and remove the Barrel Band (B-68)
Loosen, but do not remove the Take Down Screw (B-65)
Position the safety so an equal amount of the button is exposed on each side. If the safety is not in the middle when the barrel-receiver assembly is lifted out of the stock, the stock will be damaged.
Swing the barrel-receiver assembly upward away from the forearm of the stock.
Be careful the two Receiver Cross Pins (B-5) and Bolt Stop Pin (B-46) do not fall out.
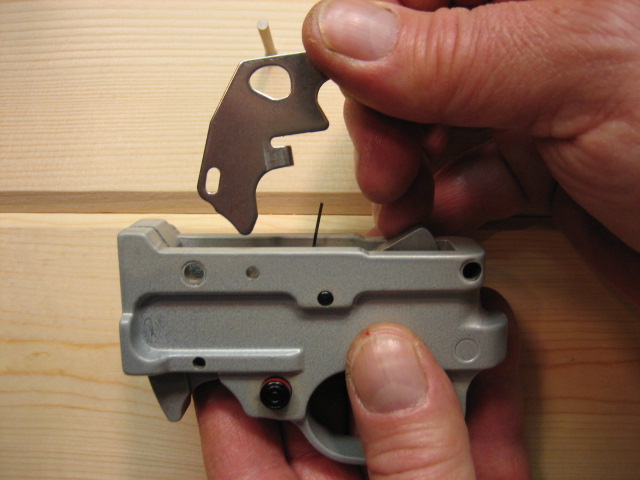
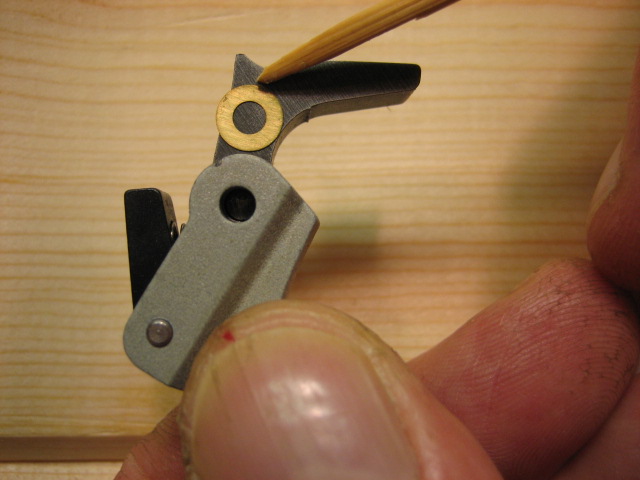
Remove the trigger assembly by drifting out the two Receiver Cross Pins (B-5)
(see figure 1)
Figure 1 ~ Cross Pins
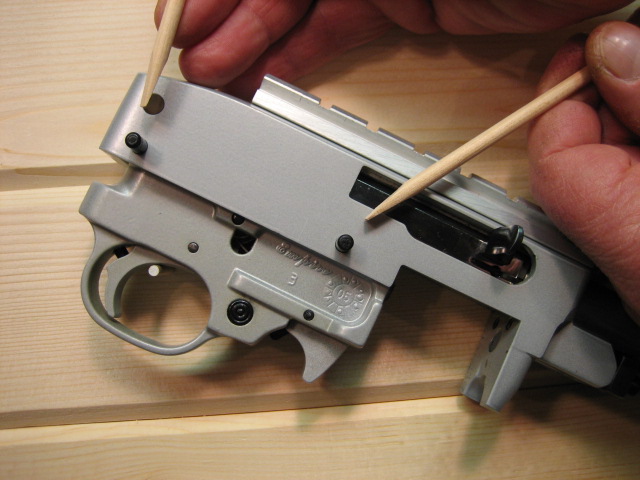
Remove trigger housing from receiver
The 1/8" wooden dowel included with the shim kit makes a handy mar-proof drift.
Holding your thumb firmly over the top of the hammer, pull the trigger and release the tension on the hammer.
Remove the Hammer Rod (B-18) and Spring (B-44) assy, and set aside.
Notice the Bolt Lock Spring (B-42) around the right side Hammer Bushing, notice that the step on one leg of the spring is holding tension on the Bolt Release, and the straight leg is trapped under the ejector cross pin.
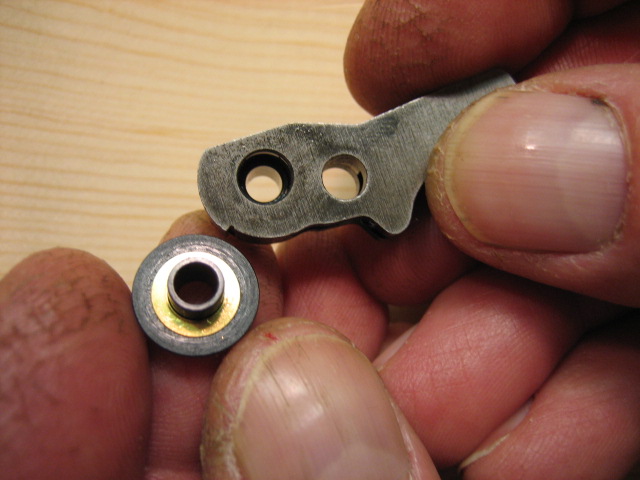
Remove the Hammer Pivot Pin, Hammer, Hammer Bushings and Bolt Lock Spring and set aside
(see figure 2)
Figure 2 ~ Remove Hammer
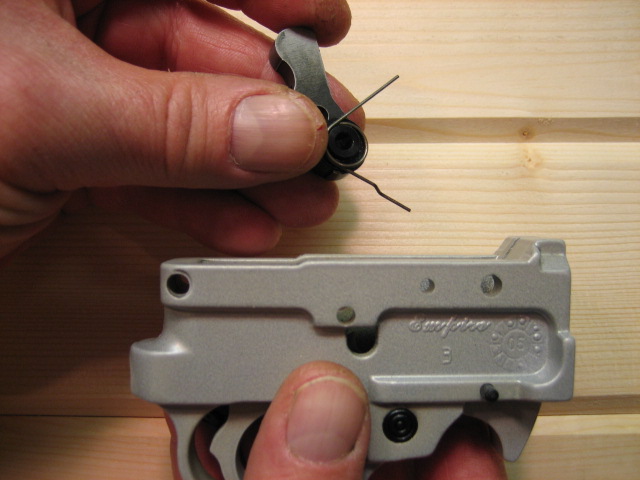
Hammer and bushings - bolt lock spring
Installing the Volquartsen Automatic Bolt Release
(see figure 3 ~ Auto Bolt Release)
Now that you have the Hammer out, you can install an automatic bolt release.
I use and recommend the Volquartsen Automatic Bolt Release.
Figure 3
Volquartsen Automatic Bolt Release
Hold the trigger housing in upright position and simply push from left to rightpin #B-35 ~ Mag Latch Pivot Pin, (see figure 4) just far enough to clear Bolt Lock, (#B-41).
Lift out Bolt Lock and slide VQ Auto Bolt Release into position.
Slide Mag Latch Pin (#B-35) back through holes into position.
At this point you can continue to remove Trigger/Sear/Disconnector assembly to install shims, or reassemble hammer, bushings and springs and reassemble trigger housing into receiver, and secure with pins (#B-5).
Be suse to check all parts function correctly before firing rifle.
Figure 4
Magazine Latch Pivot Pin #B-35
Figure 5
Trigger Pivot Pin #B-21
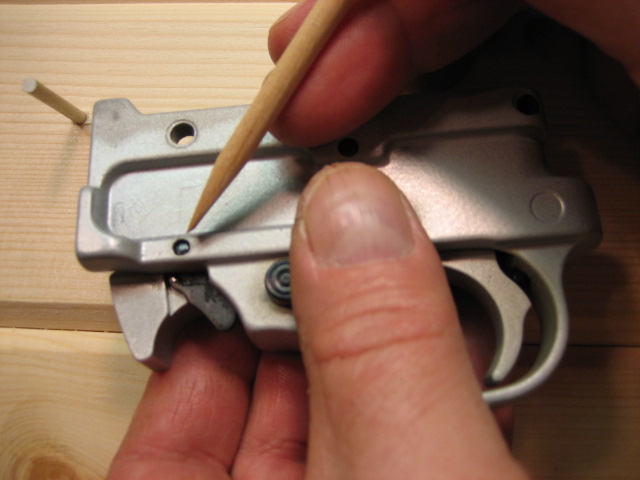
Removing the Trigger/Sear/Disconnector.
Remove Trigger Pivot Pin, (B-21) (see figure 5)
The Trigger, Sear and Disconnector will come out the top of the housing, be sure to watch the Trigger Return Plunger and Spring (#B-39, 40) will fall out of the trigger guard when removing trigger, set those parts aside.
Watch not to let the Disconnector Pin fall out, notice the relationship of the Trigger, Sear, Disconnector, and Disconnector Spring. (see figure 6)
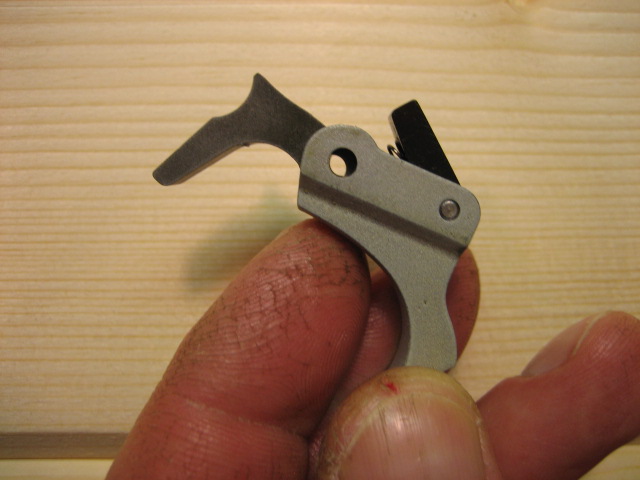
Trigger and Disconnector
Figure 7
Installing Trigger Shim
Figure 8
Installing Hammer Shims
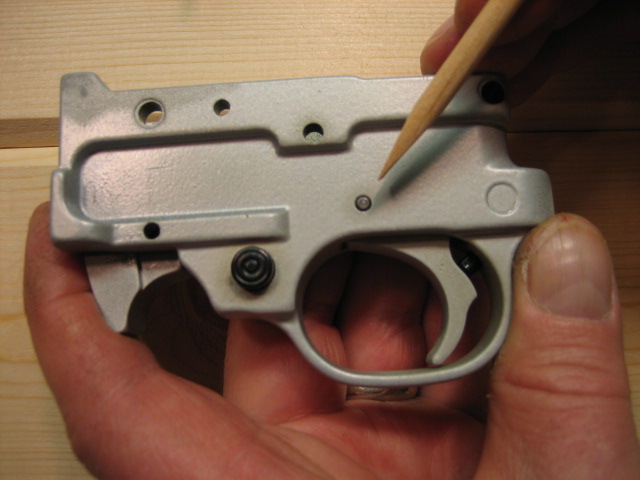
Installing the Trigger Shims.
Now its quite easy to install the Trigger and Disconnector Shims
Slide the Disconnector Pin (KE02800 - bottom pin in Figure 7) slightly out one side, about 1/8 inch, just enough that you can install a shim, put a drop of gun oil on, slide pin back in to hold shim.
Now slide the pin out 1/8" the other way, and install a shim on the other side, and the disconnector is done!
The Trigger shims will install the same way, but first you will need a Cheater Pin.
We have included a 1/8 X 7/16 steel cheater pin in our kit, or a piece of 1/8" wooden dowel rod from the hardware store works well, you may have to sand it untill it is just under 1/8" so that it will slide into the Trigger and Sear, and cut it to 7/16" in length with a razor knife.
Slide the Cheater Pin in to hold the Sear (B-23), back it out 1/8", install a shim, (see figure 7) add a drop of oil, and slide cheater pin back to hold the shim, do the same with the other side.
Reassemble Trigger and Disconnector into Trigger Housing, don't forget Trigger Return Spring and Pin, and install Trigger Pivot Pin (B-21) at the same time forcing out the Cheater Pin.. Using the same method as installing shims in Disconnector and Sear, push the Trigger Pivot Pin out one side, about 1/8", just to clear and install a shin on one side.
Do the same to the other side, add a couple drops of gun oil, and you are done with the trigger!
Install Hammer Shims with Separate Bushings
Metal Style Hammer Shims install Inside the Hammer Bushings
(B-43, see figure 8)
Install Plastic / Universal Style Hammer Shims
~ see 1022 Plastic Trigger Housing Diagram ~

Plastic Style or Universal Hammer Shims install Outside the Hammer Bushings, Between the Hammer/Bushing Assembly and the Housing
The Universal Hammer Shim will fit all styles of 10/22 Trigger Assembly's made
including the BX Trigger Assembly and both MIM Cast and 3 Piece Hammer sets because it is made to fit directly om the B-19 Pin ~ (B-19 Pin, see figure here ~ right )
On many late model guns, the Hammer Bushings are Metal Injection Molded (MIM) or Cast together as a one piece Hammer/Bushing Assembly.
If you have a Plastic Trigger Housing and a Hammer with Integral Bushings,
you will need the appropriate shims for Plastic / Universal Style Trigger Housing.
Install these shims Outside the Integral Bushing between the Hammer/Bushing Assembly and Frame.
Add a drop of gun oil and you are ready for re-assembly.
Install Hammer (B-17A), Hammer Pivot Pin (B-19) and Hammer Spring (B-44)
Be sure Bolt Lock Spring (B-42) is on the right side and the step-leg of the spring is on the inside bottom, (see figure 2) This end of the spring will engage with the Bolt Release (B-41), and the straight end will be trapped under the Ejector Cross Pin (B-35) when installing the Ejector. Further re-assembly is simply the reverse of dis-assembly.
It is of the utmost importance not to shim too tightly!
You will want some play, and no binding on any parts.
Check firearm for proper operation before loading with live ammunition.
If you are unsure about reassembly, see a qualified Gunsmith
~ You are solely responsible for the safe operation of your firearm ~
All Ruger rifles can be dry fired without damage, and dry firing can be useful to familiarize the owner with the firearm. However, be sure any firearm is completely unloaded before dry firing!
This Kit Will NOT Fit BX Trigger Assembly
Ruger Factory 10/22 Disassembly Video
Click Here ~ Ruger Factory 10/22 Tear-Down Video
Ruger Factory 10/22 Reassembly Video
Ruger 10/22 Shim Kit Installation Video
How To Install a Shim Kit
How To Install a TriggerShims Brand Shim Kit in your Ruger 10/22
Shows how to install the TriggerShims #10/22-8SS 8 Piece Shim Kit
Also shows how to Remove and Reassemble the Hammer, Trigger, Sear, Disconnector, Bolt Release and Magazine Release.
Shows how to install the Wolff Gunsprings 18076 10/22 Reduced Power Rifle Tune-Up Pak.
Shows how to Install the Volquartsen VC10BR Automatic Bolt Release and the Volquartsen VC10MR Extended Magazine Release.
Click Here for Customer Reviews of the 10/22 Shim Kits
Customer Testimonial
I ordered shim kit, hammer kit and several other items on May 13. As promised they were shipped out rapidly, and I received them fast. The quality is outstanding and the value is equally great. All in all a great pleasure to do business with you, and will return in the future. Thank you for outstanding service and quality.
Sincerely,
Joe in North Carolina
“It does not require a majority to prevail, but rather an irate, tireless minority keen to set brush fires in people's minds.” ~ Samuel Adams
UPGRADE FROM FREE ECONONY SHIPPING ~to~ SHIM TRACKING w/ SHIPPING PROTECTION #ESU
~ SHIMS ONLY ~
~ $5.00 Tracking UPGRADE ~
NOW Includes
~ SHIPPING PROTECTION* ~
~ USA ONLY ~
Upgrade from FREE ECONOMY MAIL to
Bubble Pak w/ Tracking
(Shims Only) Orders - Add TRACKING $5.00 - USA ONLY
Shim orders DO NOT include Tracking!
THIS IS FOR SHIMS - ALL OTHER ORDERS Include this Upgrade
~Click the ADD TO CART button below ANYTIME BEFORE WE SHIP SHIMS~
USA ONLY
* USPS Ground Advantage™ Service
* Replacement for items lost or damaged during shipping
~Click Here~ for PRIORITY Mail
We Cheerfully accept Cash, Money Order, and Credit Cards through our Secure PayPal Check-Out
All Website Orders are Shipped the Next Business Day
I will Ship Shims to USA, Canada and International
Gun Parts Shipped to USA Only

"American Made Gun Shims" - GunShims.com - TriggerShims.com
and
TriggerShims is a Trademark
of
Shively Sales
Michigan Center, Michigan
Copyright 2008 ~ 2022
BY PURCHASING SHIVELY SALES PRODUCTS
YOU ASSUME ALL RESPONSIBILITY FOR THEIR SAFE INSTALLATION AND USAGE.
YOU RETAIN ANY AND ALL RESPONSIBILITY FOR YOUR OWN ACTIONS. Be Safe!!
If you have any questions or safety concerns, see a qualified Gunsmith.
I manage this site myself, Please Report Any Website Problems to;
Lance at Webmaster@TriggerShims.com
Republic. I like the sound of the word. It means people can live free, talk free, go or come, buy or sell, be drunk or sober, however they choose. Some words give you a feeling. Republic is one of those words that makes me tight in the throat - the same tightness a man gets when his baby takes his first step or his first baby shaves and makes his first sound as a man. Some words can give you a feeling that makes your heart warm. Republic is one of those words. - John Wayne in the Alamo